Installation
Download the latest version from the download page.
Move the downloaded .exe file to a place of your choise. No need to install it.
Install a modpack
1. Install Minecraft
You should install Minecraft with your favorite Minecraft launcher.
- Install Java if not already done
- I suggest Eclipse Temurin
- Install your launcher, if not already done.
- Ensure to always use 64-bit edition!!!
- I suggest the Prism Launcher
- Create a new Minecraft instance and install the mod loader required by your modpack, e.g. Forge.
- Start Minecraft once to initialize the folder structure.
2. Install the modpack
For installing a modpack you first need to open the Minecraft Modpack Updater.exe. Fill in the following inputs step by step.
|
|
|
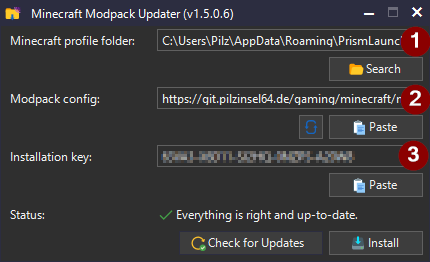
After the last input the check for updates performs automatically. You already should be able to see, if you can install the modpack or not. However, you can perform a check also manually by clicking Check for updates. Now you can click Install, if an update is available. Wait and look how the percent grows to 100.

If the installation was successfully, you will see a green tick. You can now start Minecraft again and enjoy the modpack!

Update a modpack
The process is likely the same as for installing a modpack, but you don't need to fill all inputs yourself now.
- Open the
Minecraft Modpack Updater.exe. - If not already selected, choose your Minecraft profile folder. It automatically fills in the config url and installation key you used last time.
- Hit
Check for updatesif not done automatically. - If an update is available, then click
Install.

- Watch how the procent number grows to 100.
If the update was successfull, you will see a green tick.